Last updated: May 10, 2026
Quick Answer: Replit is a free, browser-based coding environment that lets you write HTML and CSS, see live previews, and deploy websites without installing anything on your computer. It’s one of the fastest ways for beginners to start building real web pages in 2026, and this guide walks you through every step from creating your first file to publishing a live site.
Key Takeaways
- Replit requires zero local setup: open a browser, create a free account, and start coding HTML and CSS immediately [3].
- The built-in live preview updates your webpage as you type, so you see changes in real time.
- Replit’s AI assistant can generate starter HTML and CSS code from plain-English descriptions [6].
- You can deploy finished projects to a public URL directly from the Replit dashboard.
- The Workspace Security Center 2.0 (released May 2026) helps you review dependency vulnerabilities across projects [1].
- Private publishing is now available on all plans, including Starter and Core, for internal testing [1].
- Replit supports over 50 programming languages, but its HTML/CSS templates are specifically designed for web development beginners [3].
- For pure frontend work, alternatives like CodePen or JSFiddle are lighter, but Replit offers a fuller development environment with AI tools and deployment built in.
What Is Replit and Why Use It for HTML and CSS?
Replit is a cloud-based integrated development environment (IDE) that runs entirely in your web browser. You don’t download software, configure a local server, or manage files on your hard drive. For learning HTML and CSS, this removes the biggest barrier most beginners face: setup.
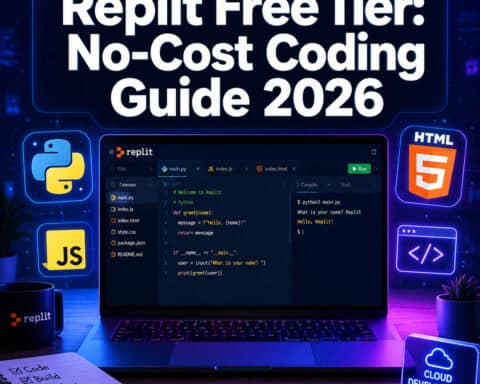
When you create a new HTML/CSS project (called a “Repl”), Replit generates three starter files: index.html, style.css, and script.js. The editor panel sits on the left, a file tree on the far left, and a live preview of your webpage appears on the right. Hit the Run button, and your page renders instantly [3].
Choose Replit if:
- You’re a beginner who wants to skip installation headaches
- You switch between multiple computers (school, home, library)
- You want AI-assisted code generation built into your editor
Consider alternatives if:
- You need offline access (VS Code with Live Server works without internet)
- You’re building large-scale production apps (local tooling offers better performance)

If you’re exploring web development tools beyond code editors, our guide to no-coding website design platforms covers options that don’t require writing code at all.
How to Set Up Your First HTML and CSS Project on Replit
Getting started takes under two minutes. Here’s the exact process:
Step-by-step setup
- Go to replit.com and create a free account using email, Google, or GitHub.
- Click “Create Repl” from your dashboard.
- Select the “HTML, CSS, JS” template from the language list [3].
- Name your project (e.g., “my-first-website”) and click “Create Repl.”
- You’ll see three files already created:
index.html,style.css, andscript.js. - Click Run to see the default page render in the preview panel.
That’s it. No terminal commands, no package managers, no configuration files.
Common mistake: Beginners sometimes create a “Python” or “Node.js” Repl by accident. Make sure you pick the HTML/CSS/JS template specifically, or your project structure won’t include the right starter files.
How Do You Write HTML on Replit? A Practical Walkthrough
HTML (HyperText Markup Language) defines the structure and content of every webpage. On Replit, you write HTML in the index.html file, and the live preview shows your changes as you save.
Here’s a minimal HTML document to start with:
Hello, World!
This is my first webpage built on Replit.
Key HTML elements every beginner should know
| Element | Purpose | Example |
|---|---|---|
<h1> to <h6> | Headings (h1 is largest) | <h1>Page Title</h1> |
<p> | Paragraph text | <p>Some text here.</p> |
<a> | Hyperlink | <a href="https://example.com">Click</a> |
<img> | Image | <img src="photo.jpg" alt="Description"> |
<div> | Generic container | <div class="card">Content</div> |
<ul> / <ol> | Unordered/ordered list | <ul><li>Item</li></ul> |
<header> / <footer> | Semantic sections | <header>Nav here</header> |
Tip: Replit now supports SVG uploads through its Agent feature [1], so you can drag SVG icons directly into your project files and reference them in your HTML with <img> tags.
If you’re designing your page layout in Figma before coding, check out our Figma web design tools and principles guide for planning your structure visually first.

How Do You Style Pages with CSS on Replit?
CSS (Cascading Style Sheets) controls how your HTML elements look: colors, fonts, spacing, layout. On Replit, you write CSS in the style.css file, which is already linked to your HTML through the <link> tag in the head section.
Here’s a basic CSS example:
<code class="language-css">body {
  font-family: Arial, sans-serif;
  margin: 0;
  padding: 20px;
  background-color: #f5f5f5;
}

h1 {
  color: #2c3e50;
  font-size: 2rem;
}

p {
  color: #555;
  line-height: 1.6;
}
</code>
Core CSS concepts to master
- Selectors: Target elements by tag (
h1), class (.card), or ID (#header) - Box model: Every element is a box with content, padding, border, and margin
- Flexbox: Use
display: flexto align items in rows or columns - CSS Grid: Use
display: gridfor two-dimensional layouts - Media queries: Make your design responsive with
@media (max-width: 768px) { }
Edge case: Replit’s preview panel is narrower than a full browser window. Always open your project in a new tab (click the external link icon above the preview) to test responsive layouts at different screen widths.
For designers transitioning from visual tools to code, our Figma to code plugins guide explains how to export designs as usable HTML and CSS.
Can Replit’s AI Help You Write HTML and CSS?
Yes, and it’s one of Replit’s strongest features for beginners. The AI assistant lets you describe what you want in plain English, and it generates working HTML and CSS code.
A February 2026 tutorial demonstrated using Replit’s “Tell AI what to do” feature to create a complete landing page from a text prompt [6]. You can type something like “Create a responsive navigation bar with a logo on the left and three links on the right,” and the AI produces the code.
What the AI does well:
- Generates boilerplate HTML structure quickly
- Creates CSS layouts (flexbox, grid) from descriptions
- Suggests fixes when your code has errors
What it doesn’t do well:
- Complex, multi-page architectures with custom interactions
- Pixel-perfect designs matching a specific mockup
- Accessibility optimization (you still need to add proper alt text, ARIA labels, etc.)
Decision rule: Use AI to generate your initial structure, then manually refine the details. Treat it as a starting point, not a finished product.
If you’re interested in how AI tools are changing web development more broadly, our guide to AI-powered content generation tools covers the wider landscape.
How Does Replit Compare to Other HTML and CSS Editors?
Choosing the right tool depends on what you need. Here’s an honest comparison:
| Feature | Replit | CodePen | JSFiddle | VS Code (local) |
|---|---|---|---|---|
| Setup required | None (browser) | None (browser) | None (browser) | Local install |
| Live preview | Built-in | Built-in | Built-in | Requires extension |
| AI code generation | Yes | No | No | Via extensions |
| Deployment | Built-in | Pro only | No | Manual |
| Offline access | No | No | No | Yes |
| Collaboration | Real-time | Limited | No | Via Live Share |
| Best for | Full projects | Quick demos | Snippet testing | Production work |
CodePen is better for sharing quick frontend experiments with a community. JSFiddle is faster for testing small code snippets without creating an account. VS Code gives you full control and offline access but requires setup.
Replit sits in the middle: more capable than snippet tools, simpler than a full local environment, and uniquely equipped with AI and deployment features [5].
For those exploring visual website builders as an alternative to hand-coding, our review of drag-and-drop website builders compares the top options.

How Do You Deploy an HTML and CSS Site from Replit?
Deploying means making your website accessible to anyone with a URL. Replit makes this straightforward.
- Click the “Deploy” button in the top-right area of your workspace.
- Choose “Static Deployment” for HTML/CSS-only projects.
- Replit assigns a URL (e.g.,
your-project.yourusername.repl.co). - Share the link with anyone.
As of May 2026, private publishing is available on all Replit plans, including Starter and Core [1]. This means you can keep your web app behind a sign-in wall for internal testing before making it public.
Security note: The Workspace Security Center 2.0, also released in May 2026, lets you scan for dependency vulnerabilities across your projects [1]. If you’re using external CSS libraries or JavaScript packages, run a security review before deploying.
What Are Common Mistakes When Learning HTML and CSS on Replit?
Most beginners hit the same issues. Here are the top five and how to fix them:
Forgetting to link the CSS file. Your
<link rel="stylesheet" href="style.css">must be inside the<head>tag, and the filename must match exactly (case-sensitive).Not closing HTML tags. Every
<div>needs a</div>. Replit’s editor highlights mismatches, but they’re easy to miss in nested structures.Using IDs instead of classes for repeated styles. IDs (
#header) should be unique per page. Use classes (.card) for styles you apply to multiple elements.Ignoring the box model. If your layout looks wrong, check padding and margin values. Use
box-sizing: border-boxin your CSS to make sizing more predictable.Testing only in Replit’s preview panel. The embedded preview doesn’t represent all screen sizes. Always open your project in a full browser tab.
For related design principles that improve your CSS layouts, our Figma mobile grid design guide covers responsive grid thinking that translates directly to CSS Grid and Flexbox.
FAQ
Is Replit free for HTML and CSS projects? Yes. Replit’s free tier includes HTML/CSS/JS project creation, live preview, and basic deployment. Paid plans add more storage, compute power, and private publishing [3].
Can I use Replit on a Chromebook or tablet? Yes. Since Replit runs in a browser, it works on any device with a modern web browser, including Chromebooks, iPads, and low-spec laptops.
Does Replit support CSS frameworks like Bootstrap or Tailwind?
Yes. You can add Bootstrap via a CDN link in your HTML <head> tag, or install Tailwind through Replit’s package manager. No extra configuration needed.
How do I add images to my Replit HTML project?
Upload image files directly to your project’s file tree by dragging them in. Replit now supports SVG uploads through its Agent feature as well [1]. Reference them with <img src="filename.png" alt="description">.
Can multiple people edit the same Replit project? Yes. Replit supports real-time collaboration. Share your Repl’s link with teammates, and they can edit alongside you, similar to Google Docs.
Is Replit good enough for professional web development? For learning and prototyping, absolutely. For production websites with complex build pipelines, most professionals use local editors like VS Code. Replit is best as a learning tool and rapid prototyping environment.
What happens to my projects if I stop paying for Replit? Free-tier projects remain accessible. If you downgrade from a paid plan, you lose access to paid features (like private publishing and extra storage), but your code stays intact.
Can I export my code from Replit to use elsewhere? Yes. You can download your entire project as a zip file or push it to a GitHub repository directly from the Replit interface.
Does Replit teach HTML and CSS, or is it just an editor? Both. Replit offers built-in courses with hands-on exercises for HTML and CSS fundamentals, making it a learning platform as well as a coding tool [5].
Conclusion
To master web development with HTML and CSS on Replit in 2026, start by creating a free account and selecting the HTML/CSS/JS template. Write your HTML structure in index.html, style it in style.css, and use the live preview to iterate quickly. Lean on Replit’s AI assistant for generating starter code, but always refine the output manually to build real understanding.
Your next steps:
- Create your first Repl today at replit.com/languages/html [3].
- Build a simple personal page with a heading, paragraph, image, and styled navigation bar.
- Deploy it using Replit’s static deployment feature and share the URL.
- Explore CSS Flexbox and Grid to create responsive layouts that work on phones and desktops.
- Review your project’s security using the Workspace Security Center 2.0 before sharing publicly [1].
The gap between “I want to learn web development” and “I have a live website” has never been smaller. Replit closes that gap to about five minutes.
References
[1] Watch – https://www.youtube.com/watch?v=n0q5xCxCvEk [3] Html – https://replit.com/languages/html [5] Best Replit Courses Beginners – https://replstack.com/blog/best-replit-courses-beginners [6] Watch – https://www.youtube.com/watch?v=KjV_gNVS6jI [7] News – https://blog.replit.com/category/news