Last updated: May 14, 2026
Quick Answer
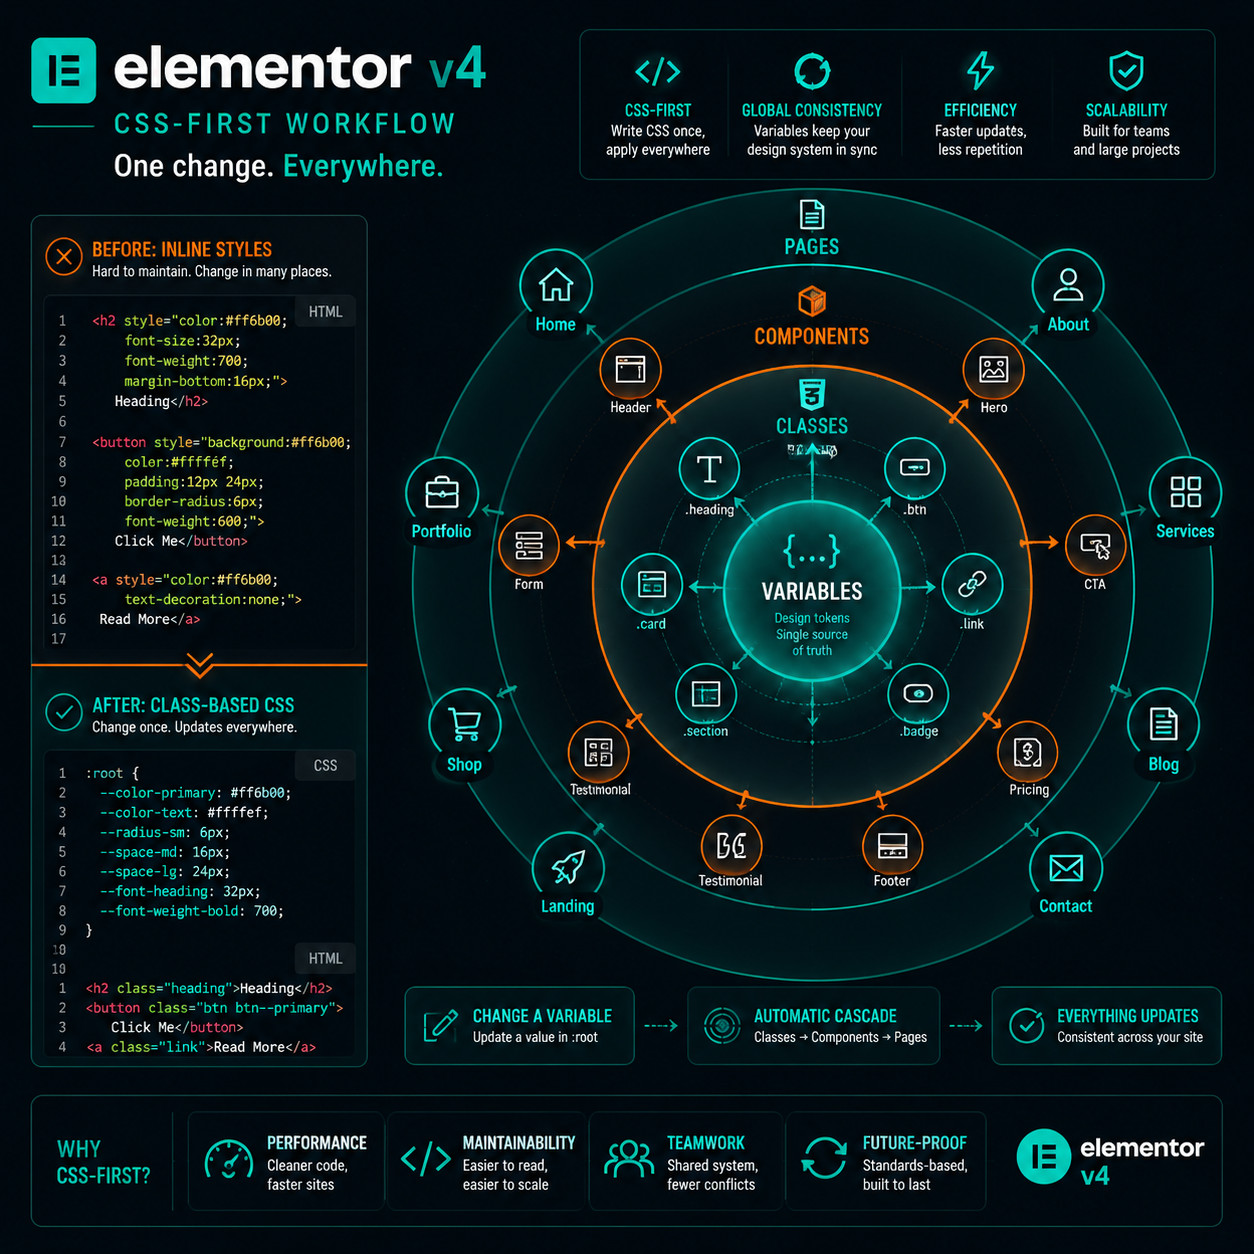
Elementor v4 fundamentally changes how CSS is generated and delivered by replacing nested widget wrappers with single-div Atomic Elements and moving from inline styles to a class-based CSS system. The result is smaller stylesheets, a lighter DOM, and measurably faster page rendering. To get the full benefit, you need to enable Atomic Elements, adopt the Variables and Classes workflow, replace legacy sections with containers, and configure Elementor’s built-in performance settings.
Key Takeaways
- Atomic Elements in Elementor v4 output pure HTML tags with a single wrapper div instead of multiple nested layers, directly reducing DOM complexity [4].
- The CSS-first architecture centralizes styles into reusable classes, eliminating the per-widget inline styling that caused CSS bloat in v3 [1].
- Mixed sites running both v3 widgets and v4 Atomic Elements will see only partial performance gains until legacy widgets are fully replaced [7].
- Enabling Improved CSS Loading and Inline Font Icons in Elementor’s settings can reduce initial CSS payload by an estimated 15–20% [7].
- Converting from legacy sections to Flexbox Containers alone has been shown to reduce DOM elements by roughly 25% in documented case studies [9].
- The Variables Manager lets you define global design tokens (colors, spacing, typography) that compile into efficient CSS custom properties [6].
- V4’s class system is production-stable as of early 2026, though some advanced features like full custom CSS support are still maturing [4].
- Performance gains are cumulative: each technique stacks on the others for the biggest improvement.
What Changed in Elementor v4’s CSS Architecture?
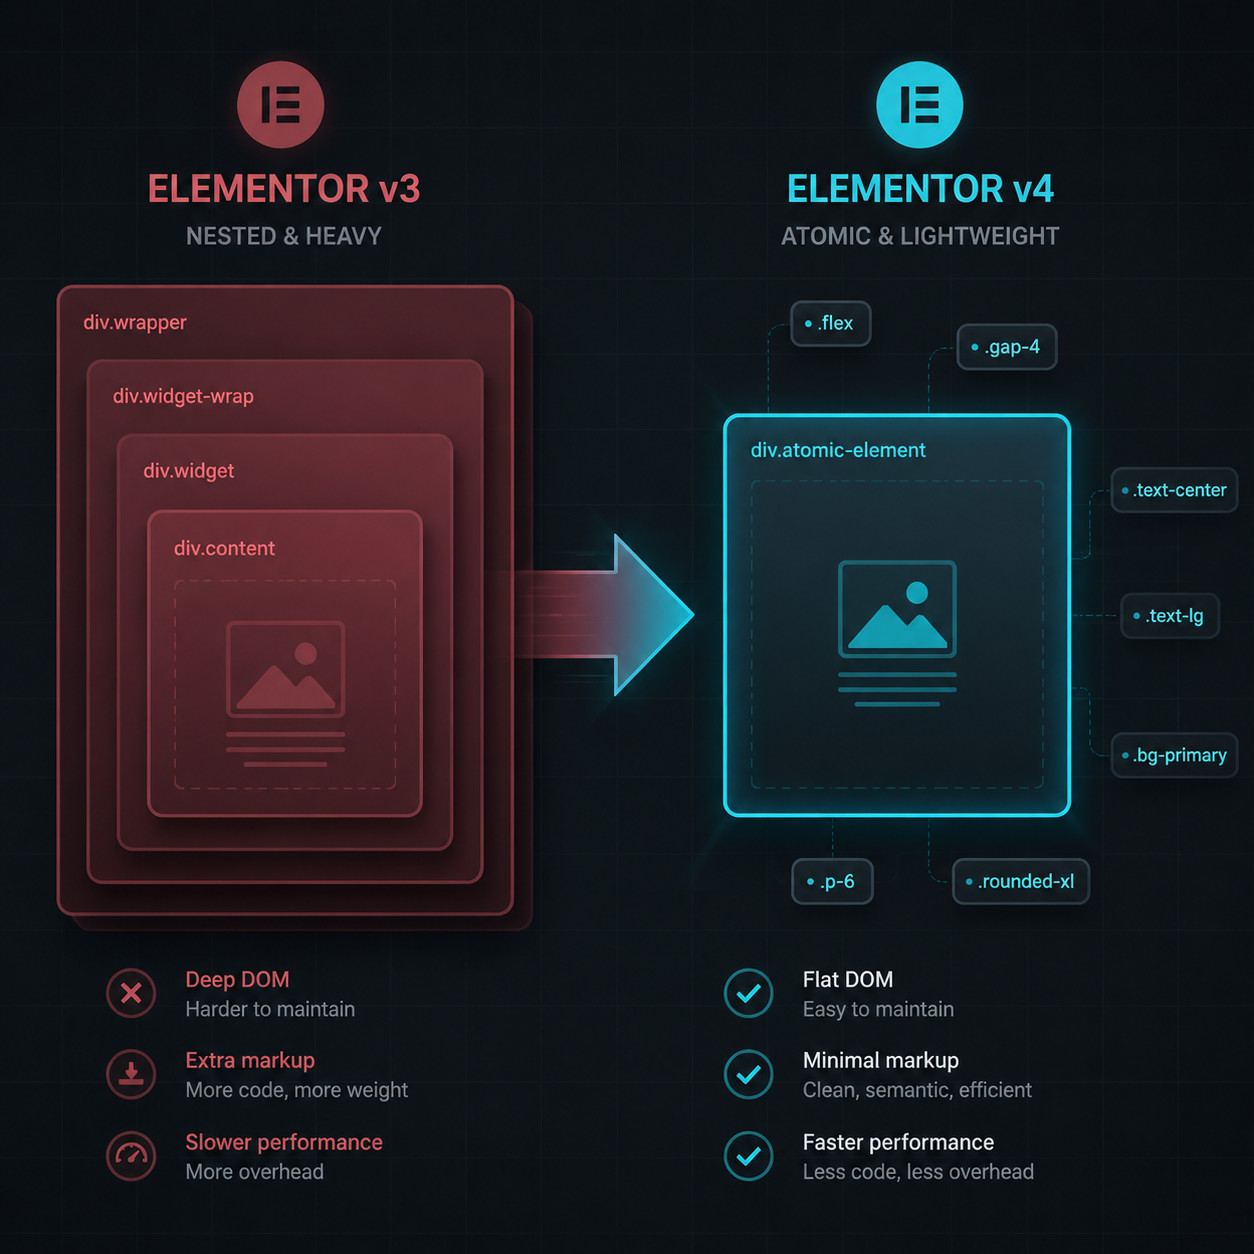
Elementor v4 replaced the old widget rendering model with a CSS-first, class-based system built on Atomic Elements. This is the single biggest architectural shift since Elementor launched.
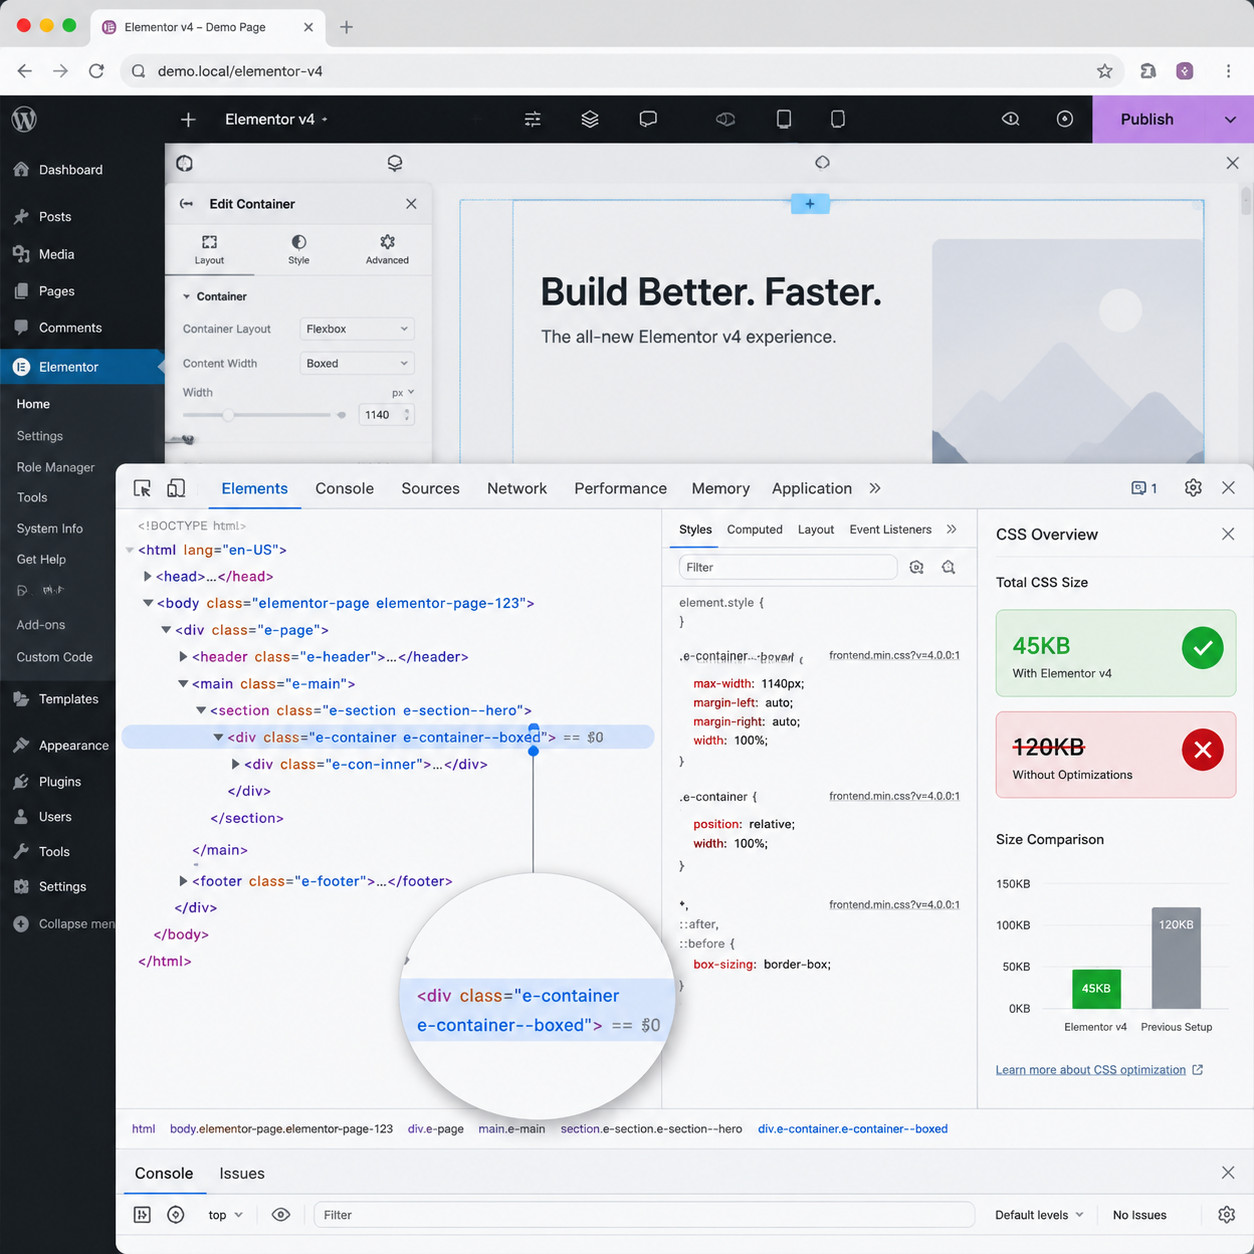
In v3, every widget generated multiple nested <div> wrappers. A simple heading might produce three or four layers of markup, each carrying its own inline styles. Multiply that across a full page with 40+ widgets, and you’d end up with hundreds of unnecessary DOM nodes and a bloated stylesheet full of duplicate declarations.
V4 takes a different approach:
- Atomic Elements render as a single
<div>(or the appropriate semantic HTML tag) without extra wrapper layers [4]. - Styles are defined through classes, not inline attributes. A button styled as “primary-button” references a single class definition rather than repeating the same 15 CSS properties on every instance [1].
- Variables (CSS custom properties) handle design tokens like colors, font sizes, and spacing at a global level [6].
- Components let you create reusable element groups that share both structure and styling.
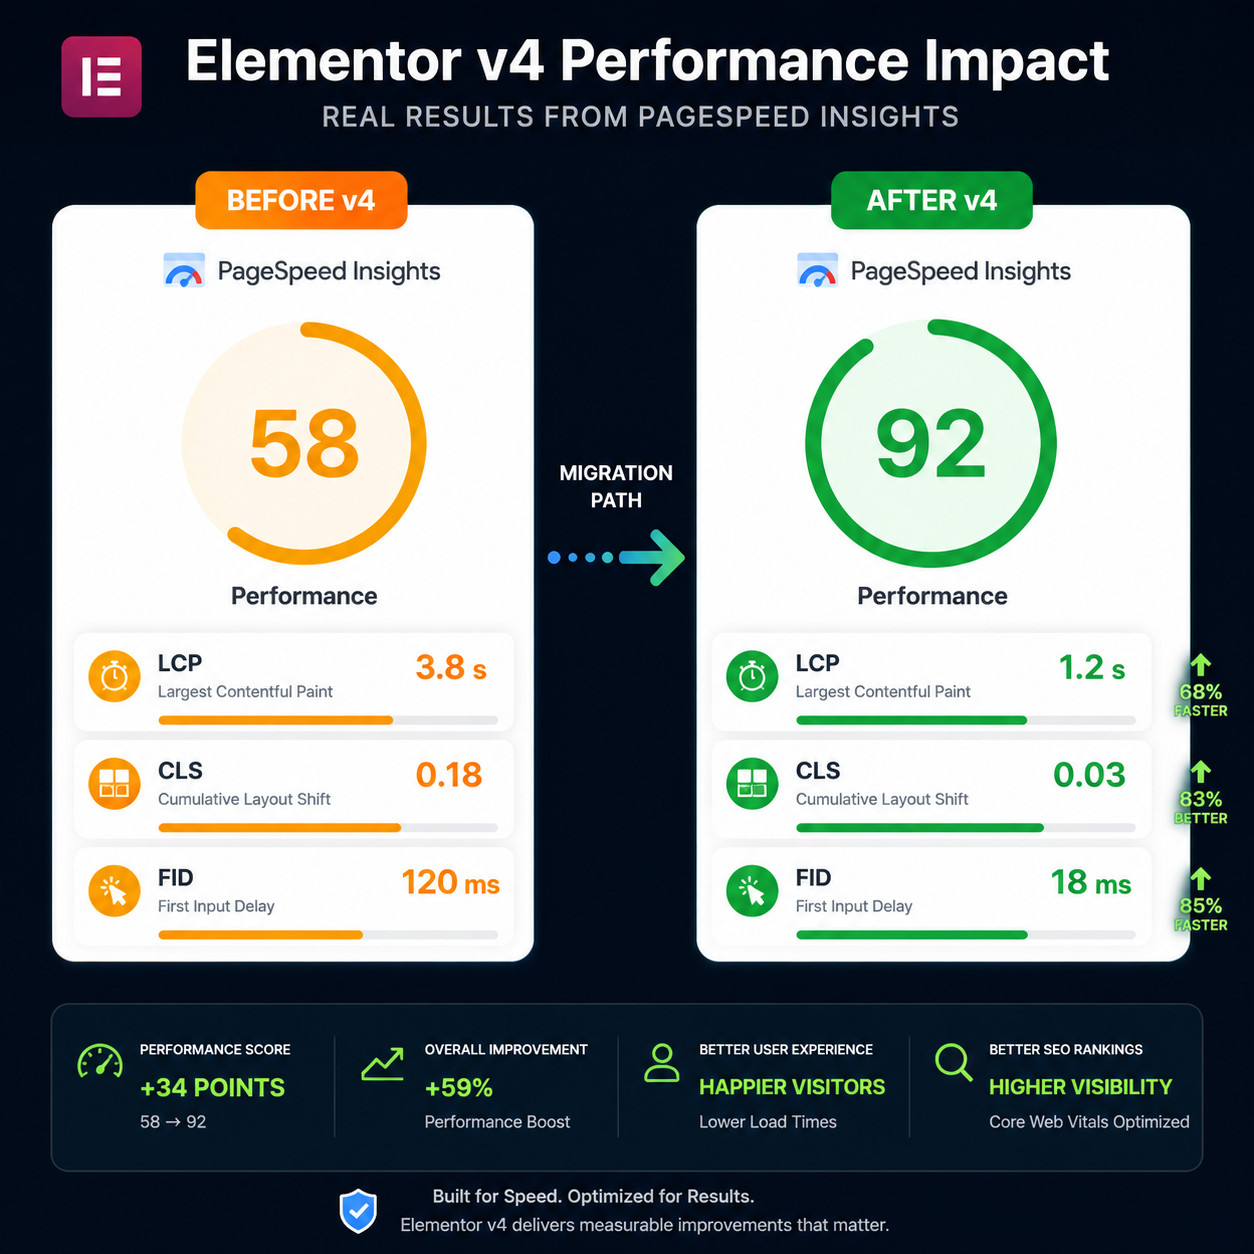
This matters because browsers parse and render the DOM sequentially. Fewer nodes and smaller CSS files mean the rendering engine finishes faster, which directly improves Core Web Vitals like Largest Contentful Paint (LCP) and Cumulative Layout Shift (CLS).
Common mistake: Assuming you’ll get full v4 benefits by simply updating the plugin. If your site still uses v3 widgets alongside new Atomic Elements, performance gains will be partial at best [7]. You need to actively migrate widgets to see the full improvement.
For those working across multiple platforms, similar principles of performance-focused design apply in tools like Webflow. Our guide on optimizing Webflow grid layouts for performance covers comparable strategies for that ecosystem.
How Do Variables, Classes, and Components Work Together for CSS Performance?
Variables, Classes, and Components form a three-layer system that eliminates redundant CSS output. Think of them as a hierarchy: Variables feed into Classes, and Classes get applied to Components.
Variables: Your Global Design Tokens
The Variables Manager introduced in Elementor 3.33 (and central to v4) lets you define values once and reference them everywhere [6]. For example:
| Variable Type | Example | CSS Output |
|---|---|---|
| Color | --e-primary-color: #2563eb | Single declaration, referenced by all elements using that color |
| Font Size | --e-heading-size: 2rem | One definition instead of repeated font-size on every heading |
| Spacing | --e-section-padding: 3rem | Consistent padding without per-element overrides |
When you change a variable value, every element referencing it updates automatically. From a CSS standpoint, this means your stylesheet contains one declaration per variable instead of dozens of identical property values scattered across selectors.
Classes: Reusable Style Bundles
Classes in v4 work similarly to traditional CSS classes. You define a class like .e-btn-primary with a set of properties, then apply it to any element. The key performance benefit: the CSS for that class is written once in the stylesheet, no matter how many elements use it [1].
Choose classes when: you have a visual pattern repeated across multiple pages (buttons, cards, badges, section headings).
Skip classes when: a style is truly unique to one element. Adding a class for a one-off style creates unnecessary overhead in the class management UI without any CSS savings.
Components: Structure + Style Reuse
Components bundle both the HTML structure and the applied classes into a reusable block. Change the component’s template, and every instance updates. This prevents the common v3 problem where developers would copy-paste a section, make small tweaks, and end up with slightly different inline styles on each copy.
Edge case: Components currently have some limitations around nested customization. If you need heavy per-instance overrides, you may find that individual Atomic Elements with shared classes give you more flexibility in the current v4 release.
If you’re interested in how design systems translate from tools like Figma into production, our guide to Figma UI kits and design systems covers the design-side foundations.
What Are the Concrete Steps for Mastering CSS Performance in Elementor v4?
Start with Elementor’s built-in performance settings, then progressively adopt the v4 workflow features. Here’s the sequence I recommend, ordered by effort-to-impact ratio.
Step 1: Enable Built-in Performance Settings
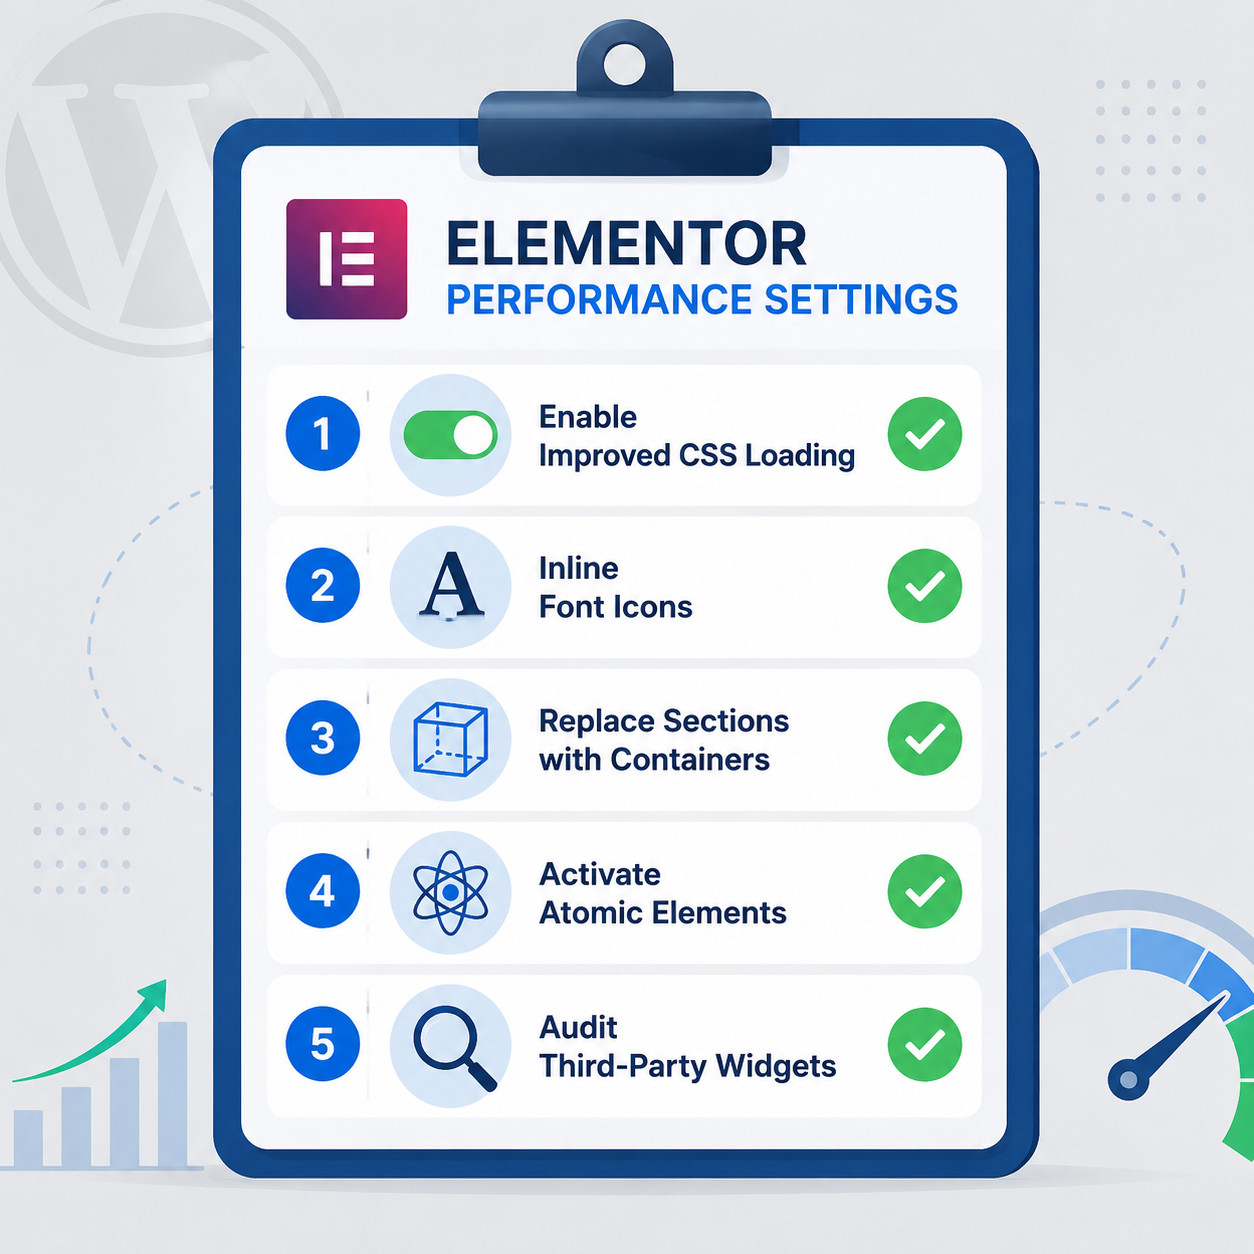
Go to Elementor > Settings > Performance and configure these options:
- Improved CSS Loading — Generates a separate CSS file per page and loads only what’s needed. This alone can cut initial CSS payload significantly [7].
- Inline Font Icons — Replaces the Font Awesome library request with inline SVGs, eliminating a render-blocking resource [7].
- Improved Asset Loading — Defers JavaScript and CSS that isn’t needed for above-the-fold content.
- Optimized DOM Output — Removes legacy wrapper divs from widgets that support it (a precursor to full Atomic Elements).
Step 2: Replace Sections with Containers
If your site still uses the legacy Section > Column layout model, migrate to Flexbox Containers. One documented case study showed a 25% reduction in DOM elements and measurable LCP improvement after converting a landing page from sections to containers [9].
How to migrate:
- Open each page in the editor
- Right-click on a Section and select “Convert to Container” (available since Elementor 3.6+)
- Review the layout, as some nested column arrangements may need manual adjustment
- Test on mobile breakpoints, since Flexbox behavior differs from the old column grid
Step 3: Activate Atomic Elements
For new installations in 2026, Atomic Elements are on by default [4]. For existing sites upgrading to v4:
- Go to Elementor > Settings > Features
- Enable Atomic Elements (labeled as stable/production-ready)
- New elements you add will use the atomic rendering model
- Existing v3 widgets on your pages will continue to render with the old markup until you replace them
Step 4: Build with Classes and Variables
This is where the CSS performance gains compound:
- Define your color, typography, and spacing variables in the Variables Manager
- Create classes for your repeating patterns (buttons, headings, card layouts)
- Apply classes to elements instead of styling each one individually
- When you need a variation, extend a class rather than creating a new one from scratch
Step 5: Audit Third-Party Widgets
Third-party Elementor add-on plugins (like Essential Addons, JetElements, etc.) often load their own CSS and JavaScript globally, regardless of whether you use their widgets on a given page. Each additional add-on can add 50–150KB of unneeded assets.
Decision rule: If you use fewer than 3 widgets from an add-on pack, consider replacing them with native Elementor v4 elements or lightweight standalone plugins. If the add-on is essential, check whether it offers per-page asset loading.
For WordPress-specific plugin management strategies, see our essential guide to WordPress plugin development best practices.
How Does Elementor v4 Affect Core Web Vitals?
Each Core Web Vital is affected differently by v4’s changes. Here’s a breakdown of the specific mechanisms.
Largest Contentful Paint (LCP)
LCP measures how quickly the largest visible element renders. V4 improves LCP through:
- Smaller CSS files that the browser parses faster before first render
- Fewer DOM nodes that reduce the rendering tree construction time
- Improved CSS Loading that delivers only page-specific styles [7]
Cumulative Layout Shift (CLS)
CLS tracks unexpected layout movement. V4 helps because:
- Atomic Elements have predictable, minimal markup, reducing the chance of late-loading styles causing reflow
- The class-based system ensures consistent sizing across elements, so dimensions are known before render
- Variables enforce uniform spacing, preventing the inconsistent padding/margin values that cause shift
Interaction to Next Paint (INP)
INP (which replaced FID in 2024) measures responsiveness to user input. V4’s impact here is indirect but real:
- A lighter DOM means event handlers have fewer nodes to traverse
- Reduced JavaScript from Elementor’s frontend runtime (Atomic Elements need less initialization code)
- Deferred asset loading keeps the main thread less congested during interactions
Before/After: What to Expect
Setting realistic expectations matters. Here’s a general framework based on available community reports and Elementor’s documentation:
| Scenario | Expected Improvement |
|---|---|
| Enabling performance settings only (no v4 migration) | Moderate: ~15–20% CSS reduction [7] |
| Full container migration from sections | Significant: ~25% DOM reduction [9] |
| Atomic Elements + Classes on a new build | Substantial: lean markup + minimal CSS from the start |
| Mixed site (v3 widgets + some v4 elements) | Partial: benefits only apply to v4 elements [7] |
| Full v4 migration + performance settings + third-party audit | Maximum: cumulative gains across all metrics |
Important caveat: Exact numbers depend heavily on your specific site. A page with 10 widgets will see less absolute improvement than one with 80. Always measure with tools like Google PageSpeed Insights or WebPageTest before and after changes.
For broader site performance strategies beyond CSS, our piece on AI-powered content optimization covers how content delivery affects overall page speed.
What Are the Current Limitations and Workarounds?
V4 is production-stable, but it’s not feature-complete. Knowing the current gaps helps you plan your migration realistically.
Known Limitations (as of May 2026)
- Custom CSS support is still catching up. Some users report that adding custom CSS to Atomic Elements doesn’t work the same way as with v3 widgets. Workaround: use the WordPress Customizer’s Additional CSS panel or a child theme stylesheet for now.
- Not all widgets have atomic versions yet. The migration is progressive, and some complex widgets (like forms, sliders, and some Pro widgets) still use the v3 rendering model.
- Class management UI has been described by community members as feeling like an “early prototype” with workflow friction around organizing and finding classes on larger projects.
- Third-party compatibility varies. Add-on plugins built for v3’s DOM structure may break or render incorrectly with Atomic Elements. Check compatibility before enabling atomic mode on production sites with heavy third-party dependencies.
Practical Workarounds
| Limitation | Workaround |
|---|---|
| Missing custom CSS on atomic elements | Add CSS via theme stylesheet or Customizer |
| V3 widget still needed | Keep it, but isolate it; v3 and v4 elements coexist on the same page |
| Class organization at scale | Use a naming convention (BEM-style) from the start; document your class library |
| Third-party plugin conflicts | Test in staging first; contact plugin authors about v4 support |
Who should wait: If your site relies heavily on third-party Elementor add-ons and custom CSS injected at the widget level, consider testing v4 on a staging site before full migration. The performance benefits are real, but so is the risk of breaking existing functionality.
Who should adopt now: New sites, redesigns, and sites using mostly native Elementor widgets are ideal candidates for immediate v4 adoption.
For those evaluating whether Elementor is the right tool for their next project, our roundup of the best no-coding website design platforms for 2026 provides useful context.
Advanced Techniques for Mastering CSS Performance with Elementor v4 Optimization
Beyond the basics, several advanced strategies can push your Elementor v4 site’s CSS performance even further.
Minimize CSS Specificity Conflicts
V4’s class system works best when you avoid overriding classes with inline styles. Every time you add a one-off style override to an element that already has a class, Elementor may generate additional CSS to handle the specificity. Keep your class definitions clean and create variant classes (like .btn-primary-large) instead of per-element overrides.
Use the Cascade Intentionally
With Variables feeding into Classes, you can create a predictable cascade:
- Global variables set the base values
- Page-level variable overrides adjust for specific contexts (e.g., a dark-themed landing page)
- Classes consume the variables
- Per-element adjustments are the last resort
This mirrors how professional front-end developers structure CSS in hand-coded projects, and it produces similarly efficient output.
Lazy Load Below-the-Fold Sections
Even with optimized CSS, loading styles for content the user hasn’t scrolled to yet wastes bandwidth. Combine Elementor’s Improved CSS Loading with a lazy-loading strategy:
- Use Elementor’s built-in lazy load for images and videos
- Consider splitting very long pages into separate page templates linked by anchor navigation
- For complex interactive sections (tabs, accordions, carousels), the deferred asset loading setting prevents their CSS and JS from blocking initial render
Monitor CSS File Growth Over Time
One pattern observed with Elementor sites is that CSS files tend to grow as more style variants are added over months of content creation. V4’s class system reduces this compared to v3, but it doesn’t eliminate it entirely.
Best practice: Audit your CSS quarterly. Tools like Chrome DevTools’ Coverage tab show you what percentage of your CSS is actually used on a given page. If coverage drops below 60%, you likely have orphaned styles from deleted pages or unused class variants.
For WordPress users looking at broader site management automation, our advanced WordPress strategies for power users covers complementary techniques.
Migration Checklist: From v3 to v4
Use this checklist to plan and execute your migration systematically.
- Back up your site (full backup including database and files)
- Set up a staging environment for testing
- Enable Atomic Elements in Elementor Features settings
- Enable all Performance settings (Improved CSS Loading, Inline Font Icons, Improved Asset Loading)
- Convert Sections to Containers page by page, starting with your highest-traffic pages
- Define your Variables (colors, typography, spacing) in the Variables Manager
- Create Classes for your 10–15 most common visual patterns
- Apply Classes to existing elements, replacing inline styles
- Test third-party plugins for compatibility with Atomic Elements
- Run PageSpeed Insights on key pages and document before/after scores
- Check mobile layouts since Flexbox containers may behave differently than legacy columns
- Deploy to production after staging validation
- Monitor performance weekly for the first month post-migration
FAQ
Is Elementor v4 safe to use on live production sites? Yes. Elementor confirmed in March 2026 that Atomic Elements and the v4 features are stable and safe for production use [4]. That said, always test on staging first if your site uses third-party add-ons.
Do I need to rebuild my entire site to benefit from v4? No. V4 elements and v3 widgets can coexist on the same page. However, you’ll only see full performance gains on elements that use the new atomic rendering model [7].
Will Elementor v4 fix my slow site automatically? Not automatically. You need to enable the performance settings, migrate to containers, and adopt the class-based workflow. The architectural improvements create the potential for better performance; your configuration decisions determine the actual outcome.
How much faster will my site be after migrating to v4? It depends on your starting point. Sites with heavy widget usage and legacy sections will see the most dramatic improvement. Enabling performance settings alone can reduce CSS payload by an estimated 15–20% [7], and container migration has been shown to cut DOM elements by about 25% in documented cases [9].
Can I use custom CSS with Elementor v4 Atomic Elements? Custom CSS support for Atomic Elements is still maturing. For now, use the WordPress Customizer’s Additional CSS section or a child theme stylesheet as a reliable alternative.
What happens to my existing Global Widgets in v4? Global Widgets from v3 continue to function. The new Components feature in v4 is the successor to Global Widgets, offering tighter integration with the class and variable system. You can migrate Global Widgets to Components gradually.
Do third-party Elementor add-ons work with v4? Compatibility varies by plugin. Some add-ons have already updated for v4 compatibility, while others still rely on v3’s DOM structure. Check with each add-on’s developer or test in staging.
Is the Variables Manager available in the free version of Elementor? The Variables Manager was introduced in Elementor 3.33 and is available as part of the v4 feature set. Check Elementor’s current feature comparison for free vs. Pro availability, as this may have changed since initial release [6].
Should I wait for v4 to be more mature before adopting it? If you’re building a new site, adopt v4 now. If you’re maintaining an existing complex site with many third-party dependencies, a staged migration over the next few months is the safer approach.
How does Elementor v4’s approach compare to hand-coded CSS? V4’s class-based, variable-driven system mirrors how professional developers write CSS manually. The output is significantly cleaner than v3, though hand-coded CSS will always have a slight edge since there’s zero framework overhead. For most WordPress sites, the gap is small enough that v4’s visual editing convenience more than compensates.
Conclusion
Mastering CSS performance in Elementor v4 isn’t about flipping a single switch. It’s a combination of enabling the right settings, adopting the new architectural patterns, and systematically migrating away from legacy structures.
Here’s your action plan:
- This week: Enable all performance settings in Elementor’s dashboard and run a baseline PageSpeed test on your top 5 pages.
- Next two weeks: Set up your Variables (colors, typography, spacing) and create Classes for your most-used design patterns.
- Over the next month: Convert your highest-traffic pages from Sections to Containers and replace v3 widgets with Atomic Elements where possible.
- Ongoing: Audit your CSS coverage quarterly, monitor Core Web Vitals in Google Search Console, and stay current with Elementor’s v4 feature releases as more widgets get atomic versions.
The performance ceiling for Elementor sites has risen significantly with v4. Whether you reach it depends on how deliberately you apply these techniques. Start with the highest-impact changes first, measure the results, and iterate from there.
For more web performance and design strategies, explore the latest guides on WebAiStack.
References
[1] Editor V4 Css First – https://elementor.com/blog/editor-v4-css-first/ [4] Elementor Editor 4 0 Developers Update – https://developers.elementor.com/elementor-editor-4-0-developers-update/ [6] Elementor 333 V4 Variables Manager Custom Css – https://elementor.com/blog/elementor-333-v4-variables-manager-custom-css/ [7] Speed Up – https://elementor.com/blog/speed-up/ [9] Mastering Elementor Containers Ultimate Guide Flexbox Tanmoy Biswas Qouhc – https://www.linkedin.com/pulse/mastering-elementor-containers-ultimate-guide-flexbox-tanmoy-biswas-qouhc